
Make a fabric coffee sleeve cozy, a stylish alternative to the cardboard version! This would be a great addition to a coffee shop gift card to make a lovely handmade gift. This step by step coffee cozy tutorial makes it easy to make a reusable coffee sleeve.
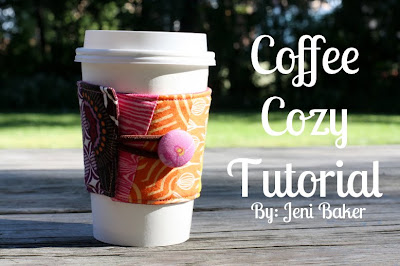
Coffee cup sleeve, coffee collar, java jacket, mug cozy, ……. no matter what you call it this one is not only stylish but eco friendly. It is perfect for a paper coffee cup filled with hot coffee or other hot beverage!
Coffee Sleeve Supplies
- Fabric scraps from up to 12 different fabrics
- 4.5″x12″ piece of backing fabric
- 4.5″x12″ piece of fusible fleece
- 1 coordinating elastic hair tie
- Small button
- Coordinating thread
- sewing machine
- scissors
Seam Allowance: 1/4″ unless noted

How to make a fabric coffee cup cozy
1. Download the sleeve pattern and print a copy of the template, making sure there is no scaling. You can check by measuring the 1″ square. Cut along the dashed line. (If you plan to make more than one, print two, and cut the second along the solid line!)
Coffee Sleeve Pattern
Free Coffee Cozy Template

2. Select your fabrics or scraps and cut twelve 1.5″x4.5″ pieces. Don’t you love this full color design?

3. Sew all 12 strips together along the 4.5″ sides. Press seams however you’d like!

4. Using the template, lay it on top of your patchwork, right sides up. Trace using a water soluble pen (just in case!). Cut out and set aside.

5. Take your lining fabric and place the template on the wrong side of the fabric. Trace and cut out.

6. Using a small length of thread, fold your hair elastic and tie a small knot about a 1/3 of the way over, so that you have two uneven loops. This will help hold it in place when you sew together your cozy!
7. Take your template and cut off the seam allowance by cutting along the solid line. Use this template to cut out your fusible fleece. Fuse to the wrong side of your patchwork piece.

8. Center your hair elastic along one edge of your patchwork piece, with the large loop on the patchwork. Secure with a few stitches with a 1/8″ seam allowance.

9. Place your front and back pieces right sides together and pin around the edges.

10. Sew around all four edges, backstitching at the start and finish, making sure to leave a 1.5″-2″ opening along the bottom edge for turning. Carefully trim the corners and the excess hair elastic.

11. Turn your work inside out, using a turning tool or dull pencil to poke out the corners, press. Top stitch very close to the edge, making sure to close up the opening.

12. On the side opposite the hair tie, center your button 1.5″ from the short edge. Mark with a pen. Start sewing your button from the front side, so that you end up with your knot finishing under the button. This leaves your backing nice and neat!
Those paper cups can get super hot. Now you can safely handle hot cups and no need for double cupping!

Voila! You’re finished! You could easily make these with more or less patchwork, or simply, without patchwork! In no time at all, you can make a stack of custom coffee sleeves! Hello, handmade gifts!

For more sewing projects to gift this season, check out these tutorials:
Scrappy Stack Mug Rug (maybe a matching one for the coffee cozy!)

Wrapped Wreath

Tutorial by Jeni from In ColorOrder! She loves to sew and hopes to give lots of handmade gifts
this holiday season! 
If you would prefer to crochet a coffee cozy here a couple free crochet patterns:
The post Fabric Coffee Sleeve Tutorial appeared first on Skip To My Lou.