
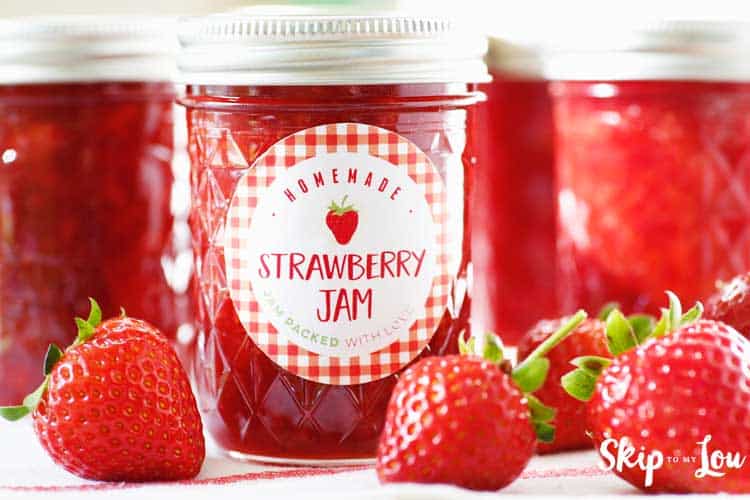
Enjoy summer fresh berries all year long with this easy strawberry jam recipe. Four simple ingredients (you don’t even need pectin) needed to make this delicious jam. I even have the cutest labels so the jam is perfect for giving!
I walk you through the canning process step by step. You will then be able to make homemade apple pie filling, onion and pepper relish, and peach salsa.

Homemade Strawberry Jam Ingredients
- 3 cups of sugar
- 3 pounds fresh strawberries
- 1 Granny Smith apple
- 2 Tablespoons bottled lemon juice
- 5 half-pint canning jars with lids and rings (wash jars before starting)
Canning Tools
(affiliate links)
- water bath canner (this one will need care if you nick the surface it will rust) this canner is much for durable, You can also use a large pot with a rack placed in the bottom. I use the Ball freshTECH Electric Water Bath Canner and Multi-Cooker
- thermometer
- jar lifter
- canning funnel
- magnetic lid grabber and bubble remover
- punch to make a circle labels for jars
- half-pint canning jars
You might also consider buying a set of canning supplies if you are new to canning.

Place 2 small plates in freezer to chill. Next hull strawberries. I love this little strawberry huller.

Cut strawberries into 1/2-inch pieces.

Peel and grate the Granny Smith apple.

Using a potato masher, crush strawberries in a large saucepan until fruit is mostly broken down, but leave a few chunks.

Add 2 tablespoons lemon juice and grated apple.

Stir in 3 cups white granulated sugar.

Stir over low heat until the sugar is dissolved. Increase heat to medium-high, and bring the mixture to a full rolling boil. Boil, stirring often until the mixture reaches 217- 220 degrees F. It will be very frothy and requires almost constant stirring to prevent it from boiling over and burning.

Test consistency by placing a teaspoon of jam on the chilled plate and freeze for 2 minutes.

Drag your finger through jam on plate; jam has correct consistency when your finger leaves a distinct trail. If the jam is runny, return the pot to heat and simmer for 1 to 3 minutes longer before retesting.

Skim foam from surface of jam using a spoon.

Keep jars warm for filling them by placing them in the hot canning water. When ready to fill the jar remove from water and drain on a tea towel.

Ladle hot jam into hot jars leaving 1/4 inch headspace.

Wipe rim.

Slide wooden skewer along the inside edge of the jar and drag upward to remove air bubbles, if needed. Center lid on jar. Apply band until fit is fingertip tight.

Place jars in a large pot and make sure tops are covered with at least an inch of water. Process filled jars for 10 minutes in a boiling water bath, adjusting for altitude.

Remove jars and cool. Check lids for seal after 24 hours. The lid should not flex up and down when the center is pressed. Refrigerate jam once the seal is broken.
Recipe Tips
- Don’t slow the cooking time. Cooking it at medium-high will help it cook quicker and retain the freshest berry taste. You must watch and stir frequently.
- In the photo above you see a candy thermometer. A digital instant-read thermometer works much better.
- A jar lifter is a must for canning. This tool has been the only way I can safely lift the jars in and out of the hot water.
- Once jars are removed from the boiling water, let them set and don’t move. You will start to hear pinging noises as the jars seal. Don’t press the tops of the lids. Let them seal naturally.
How long does homemade jam last?
If this strawberry jam recipe is canned properly it should last a year on the shelf. Refrigerate after opening.
Strawberry Jam Recipe
Delicious jam with less sugar than regular recipes, but you won't miss it. Fresh berry flavor shines through.
- 3 pounds strawberries (about 10 cups strawberries, hulled and cut into 1/2-inch pieces)
- 2 tablespoons lemon juice (bottled)
- 1 Granny Smith Apple (peeled and grated, (1 1/4 cup – this acts as the pectin))
- 3 cups granulated sugar
- 5-6 half pint glass preserving jars with lids and bands
- Place 2 small plates in freezer to chill.
- Using a potato masher, crush strawberries in a 6 to 8-quart heavy saucepan until fruit is mostly broken down, but leave a few chunks.
- Stir in sugar, apple, and lemon juice.
- Stir over low heat until the sugar is dissolved. Increase heat to medium-high, and bring the mixture to a full rolling boil. Boil, stirring often until the mixture reaches 217- 220 degrees It will be very frothy and requires almost constant stirring to prevent it from boiling over and burning.
- Remove pot from heat.
- Test consistency by placing a teaspoon of jam on the chilled plate and freeze for 2 minutes. Drag your finger through jam on plate; jam has correct consistency when your finger leaves a distinct trail. If the jam is runny, return the pot to heat and simmer for 1 to 3 minutes longer before retesting.
- Skim foam from surface of jam using a spoon.
- Ladle hot jam into hot jars leaving 1/4 inch headspace. Wipe rim. Center lid on jar. Apply band until fit is fingertip tight.
- Slide wooden skewer along the inside edge of the jar and drag upward to remove air bubbles.
- Place jars in a large pot and make sure tops are covered with at least an inch of water. Process filled jars in boiling water for 10 minutes, adjusting for altitude.
- Remove jars and cool.
- Check lids for seal after 24 hours. The lid should not flex up and down when the center is pressed.
- Refrigerate jam once the seal is broken.
How long does homemade jam last?

Wrap up your jam with these darling labels and jar toppers. You receive printables to make 2 1/4 inch circle labels and a fabric jar topper with instructions for printing on fabric with your home printer for $3.99. BUY NOW.
If you love making homemade gifts you can grab my holiday gift-giving bundle full of recipes and gift tags to wrap up an amazing holiday. The above strawberry jam labels are included in this offer. LEARN MORE.
The post EASY Strawberry Jam Recipe appeared first on Skip To My Lou.